|
It has one or more rooms with shelves (the so-called hard drives) to store your furniture
and other stuff (information in the form of files, which are organized by folders). Modern
hard drives can store plenty of files on them and are quite reliable. If you download patterns
from the Internet to your hard drive (usually drive C:\), you may feel relatively safe. However,
we suggest creating backup copies of everything that is important for you on CDs. Backup of important
information will be handy if your hard drive breaks or if your PC is infected with computer virus and you are
forced to delete everything and start over on a "clean" PC.
Attention:
Avoid storing important information on 1.44MB floppy disks. They break often,
and are absolutely unreliable. It's a good idea to use floppy disks only when you want
to copy a small amount of information from one computer to another very quickly. They are a
bad media for storing files on.
Your PC should also have at least one garage
(a slot for floppy disk and/or CD-ROM drive). These slots are there to allow you
to back up information on inexpensive portable media and to be able to use
portable media that you buy (CDs with programs, patterns, etc).
Every
computer has a hard drive called "C:\". We will now show you how to organize a
nice "shelf" for your embroidery patterns on drive C:\.
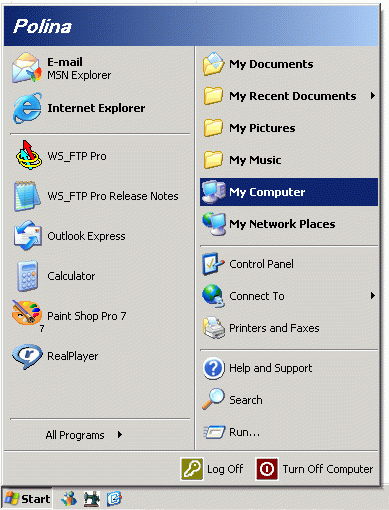
After you turn on
your computer, click "Start" ---> "My Computer", using your mouse. You will
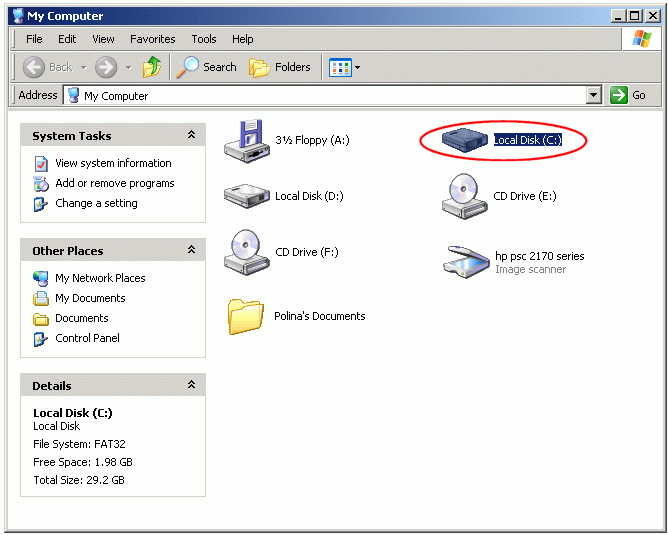
see icons that represent all "information storage" devices that your PC has.
Double click on icon that corresponds to drive C (it is labeled as "Local Disk
C:" - see screen-shots):
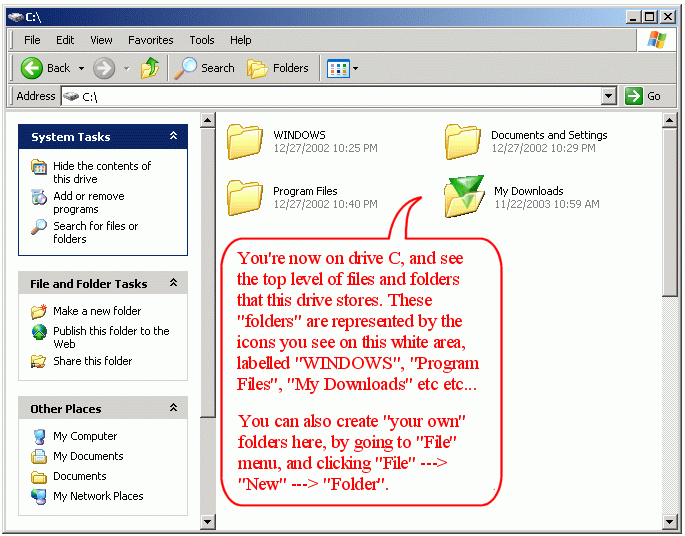

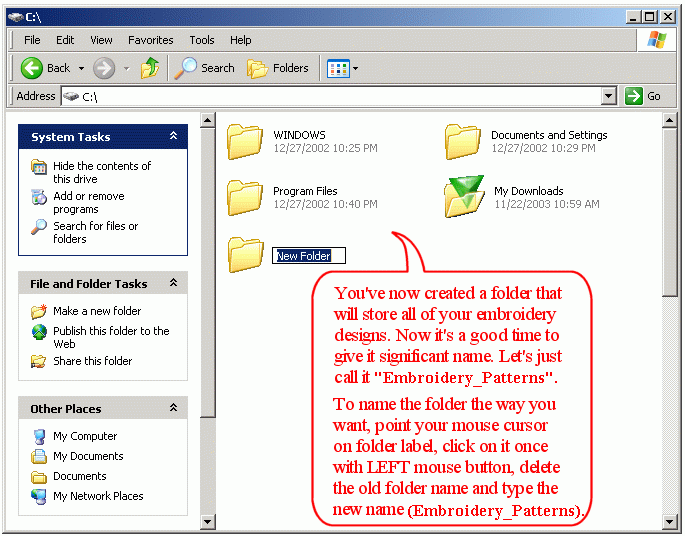
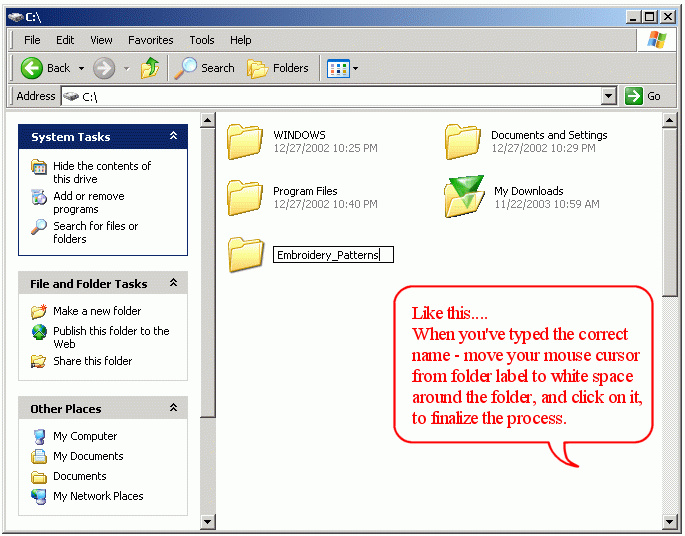
When you know how to create folders, you may make special folders for organizing
different types of files. For example, you can navigate to a folder you've just
created, called "Embroidery_Patterns", and make a few sub-folders inside it for
storing different design themes. Each folder may include an unlimited number of sub-folders
and files inside it, so it's easy to organize everything in a logical
way.
If you don't have any better system in mind, you may start by
organizing your patterns by themes.
To do this, inside
"Embroidery_Patterns" folder create several sub-folders inside of the "Embroidery Patterns" folder - one for each design
theme. Name these new folders accordingly:
1.
Fonts_Monograms
2. Project_Oriented_Sets (for collections like our
Violets, Roses Allure etc - when one set includes many shapes in one style that can be used for decorating an entire room)
3.
Floral
4. Marine
5. Animals_Birds
5.
Ethnic
6. Holidays_Events
7. Famous_Styles ( for patterns in
Art Nouveau, Art Deco, Edwardian, Victorian, Retro, and other known
styles)
Always give significant names to files and folders that you create.
You may use English letters, numbers, and underscores in file names. Avoid
using any special marks or foreign letters, in file names, since these character often
cause problems later.
Using the Folders You've Just Created
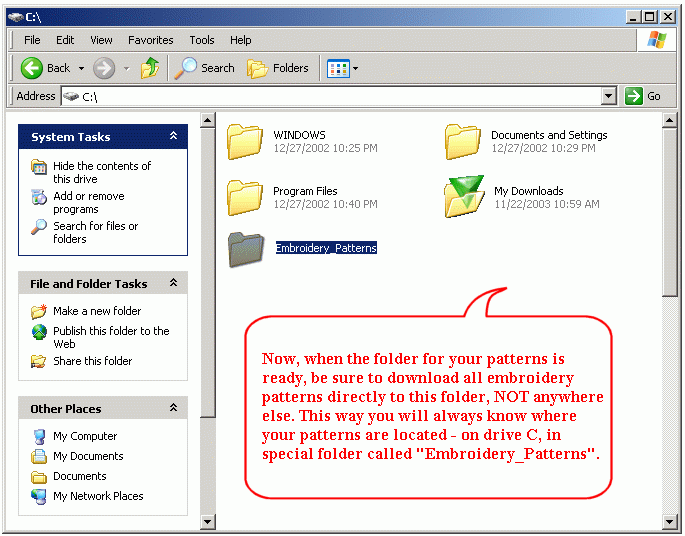
Download all of your new patterns directly to the "Embroidery_Patterns" folder, unzip them if
necessary, and check that you're happy with the files. If everything is ok, move them to the sub-folder they fit the most.
By doing this, you will have your patterns
sorted in a logical way, and you'll be able to find everything you need, when you need it.
To transfer a file (or a folder with all its contents) from one
location to another, click once on the file (or folder) icon, then click "Edit"
---> "Cut" on the top menu. Navigate to the destination folder; once there,
click "Edit" ---> "Paste".
It's also possible to transfer many different filesfrom one
place to another all at once. To do this, hold down the "Ctrl" key and mark all of the files you wish to move.
After they're all marked, continue as you did when transferring a single
file/folder.
P.S.
From time to time, remember to
backup your embroidery patterns, and other important files to CDs!
Wish you a Most Wonderful Day & Happy
Stitching!

|
